You can create a rich text cell that has text with multiple colors and fonts in the cell.
The rich text cell has a run-time menu for formatting the text in a cell and for loading a rich text formatted file (RTF). The menu also has basic edit operations such as cut, copy, paste, delete, and select all. To bring up the menu at run time the cell must be in Edit mode. Then you right-click in the cell to bring up the menu for handling the contents of that cell. Highlight the text first if you want to set the color, font, or style of the text in the cell. An example of the use of the menu is shown in this figure.
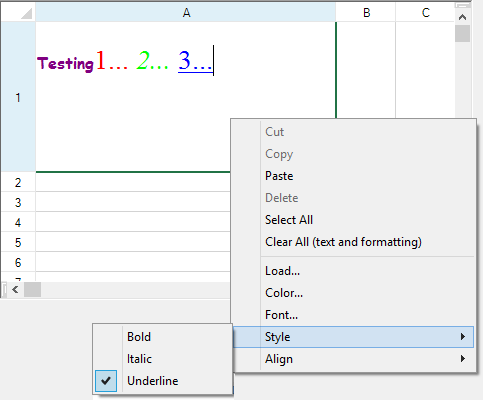
Understanding Context Menu Choices
The choices in the context menu are described in this table.
| Menu Item | Description |
|---|---|
| Cut Copy Paste | Standard Clipboard operations that cut, copy, and paste to and from the Clipboard the contents (text and formatting) of the cell |
| Delete | Removes the selected contents (text and formatting) of the cell |
| Select All | Selects the entire contents (text and formatting) of the cell |
| Clear All | Clears the entire contents (text and formatting) of the cell |
| Load | Opens the File Open dialog to allow you to select an RTF file to load |
| Color | Opens a color palette to allow you to select a color that is either applied to selected text or is used as the color of subsequent text |
| Font | Opens a font picker to allow you to select a font face and size that is either applied to selected text or is used as the font of subsequent text |
| Style | Opens a menu to allow you to select a font style (bold, italics, or underline) that is either applied to selected text or is used as the font of subsequent text |
| Align | Opens a menu to allow you to set the text alignment |
Using the Rich-Text Cell
When the rich-text cell is first edited or text is loaded, the RTF string of data and formatting information is set in the cell. Subsequent changes to the cell, column, or row appearance settings (such as font, text color, alignment) do not affect the existing text because the formatting information for that text is already set. For the newer settings to be applied to the original string, you must completely clear the cell of both data and formatting.
You can use the Value property in code to load the contents of an RTF file as a string of RTF commands, or you can set any set of RTF commands directly.
Setting a property such as alignment may not apply after the cell has been modified in edit mode. Many formatting properties (HorizontalAlignment, Font, ForeColor, and so on) can be set in the hidden RTF code associated with the value of the cell. For example, setting the HorizontalAlignment property prior to any editing may correctly set the alignment, but setting this property after editing might not have the desired effect. RTF has hidden formatting embedded in the RTF string which can be parsed or viewed through the Value property of the cell.
The cell width may be off several pixels if you automatically size the rich text cell and you are using multiple fonts.
Deleting the text from a rich-text cell puts a non-null string in the cell. This may cause unexpected results with the ISBLANK and COUNTBLANK formula functions since they treat the non-null string as non-blank.
If the WordWrap property is true when using the GetPreferredRowHeight method, the height may be slightly larger if the last character on a wrapped line is on the border.
Important Notes
The rich-text cell uses the Microsoft .NET RichTextBox class for editing. Text using a font with extended character sets, like MSPMincho, cannot be set to a font that does not support extended character sets, like Tahoma. The result is that RichTextBox does not allow you to change the font of a Far East script-based font to a Western font.
This font issue is a limitation of the RichTextBox for the Microsoft Windows 2000 operating system. If you try to set a font that does not support extended character sets, like Tahoma, on text with extended characters, a message box is displayed.
For more information on the properties and methods of this cell type, refer to the RichTextCellType class.
Using the Properties Window
- At design time, in the Properties window, select the Spread component.
- Select the Sheets property.
- Click the button to display the SheetView Collection Editor.
- In the Members list, select the sheet in which the cells appear.
- In the property list, select the Cells property and then click the button to display the Cell, Column, and Row Editor.
- Select the cells for which you want to set the cell type.
- In the property list, select the CellType property and choose the RichText cell type.
- Expand the list of properties under the CellType property. Select and set these specific properties as needed.
- Click OK to close the Cell, Column, and Row Editor.
- Click OK to close the SheetView Collection Editor.
Using Code
- Define a rich text cell by creating an instance of the RichTextCellType class.
- Specify the properties of the RichTextCellType class.
- If you want to load RTF data, set the Value property of the RichTextCellType class to load the data
- Assign the rich text cell type to a cell or range of cells by setting the CellType property for a cell, column, row, or style to the RichTextCellType object.
Example
This example creates a rich text cell and loads data.
| C# |
Copy Code
|
|---|---|
FarPoint.Win.Spread.CellType.RichTextCellType rtf = new FarPoint.Win.Spread.CellType.RichTextCellType(); rtf.WordWrap = true; rtf.Multiline = true; fpSpread1.ActiveSheet.Cells[0, 0].CellType = rtf; fpSpread1.ActiveSheet.Columns[0].Width = 300; fpSpread1.ActiveSheet.Rows[0].Height = 150; fpSpread1.ActiveSheet.Cells[0, 0].Value = @"{\rtf1\ansi\ansicpg1252\deff0\deflang1033 {\fonttbl{\f0\fscript\fprq2\fcharset0 Comic Sans MS;} {\f1\froman\fprq2\fcharset0 Times New Roman;} {\f2\fswiss\fcharset0 Arial;}}{\colortbl ;\red128 \green0\blue128;\red0\green255\blue255;\red255\green0\ blue0;\red0\green255\blue0;\red0\green0\blue255;} \viewkind4\uc1\pard\cf1\b\f0\fs24 Testing\cf2\b0\fs28 \cf3 \f1\fs40 1... \cf4\i 2... \cf5\ul\i0 3...\cf0\f2\fs20\par}"; |
|
| VB |
Copy Code
|
|---|---|
Dim rtf As New FarPoint.Win.Spread.CellType.RichTextCellType() rtf.WordWrap = True rtf.Multiline = True fpSpread1.ActiveSheet.Cells(0, 0).CellType = rtf fpSpread1.ActiveSheet.Columns(0).Width = 300 fpSpread1.ActiveSheet.Rows(0).Height = 150 fpSpread1.ActiveSheet.Cells(0, 0).Value = "{\rtf1\ansi\ansicpg1252\deff0\deflang1033" + _ "{\fonttbl{\f0\fscript\fprq2\fcharset0 Comic Sans MS;}" + _ "{\f1\froman\fprq2\fcharset0 Times New Roman;}" + _ "{\f2\fswiss\fcharset0 Arial;}}" + _ "{\colortbl ;\red128\green0\blue128;\red0\green255\blue255;" + _ "\red255\green0\blue0;" + _ "\red0\green255\blue0;\red0\green0\blue255;}" + _ "\viewkind4\uc1\pard\cf1\b\f0\fs24 Testing\cf2\b0\fs28" + _ " \cf3\f1\fs40 1... \cf4\i 2... \cf5\ul\i0 3...\cf0\f2\fs20\par" + _ "}" |
|
Example
This example loads a rich text file.
| C# |
Copy Code
|
|---|---|
System.IO.TextReader f = System.IO.File.OpenText("your_file.rtf"); string bits; bits = f.ReadToEnd(); f.Close(); fpSpread1.ActiveSheet.Cells[0, 0].CellType = new FarPoint.Win.Spread.CellType.RichTextCellType(); fpSpread1.ActiveSheet.Cells[0, 0].Value = bits; |
|
| VB |
Copy Code
|
|---|---|
Dim f as System.IO.TextReader = System.IO.File.OpenText("your_file.rtf") Dim bits As String bits = f.ReadToEnd() f.Close() fpSpread1.ActiveSheet.Cells(0, 0).CellType = New FarPoint.Win.Spread.CellType.RichTextCellType() fpSpread1.ActiveSheet.Cells(0, 0).Value = bits |
|
Using the Spread Designer
- Select the cell or cells in the work area.
- In the property list, in the Misc category, select CellType. From the drop-down list, choose the RichTextCellType cell type. Now expand the CellType property and various properties are available that are specific to this cell type. Select and set those properties as needed.
Or right-click on the cell or cells and select Cell Type. From the list, select RichText. In the CellType editor, set the properties you need. Click Apply.
- From the File menu choose Apply and Exit to apply your changes to the component and exit Spread Designer.