You can provide header and footers that appears on the printed pages. Using the Header property and Footer property of the PrintInfo class, which may include special control commands, you can specify text and variables, such as page numbers, as well as specify the font settings. The font related commands begin with "f".
The control commands that can be inserted in headers and footers are listed in this table:
| Control Character | Full Command | Action in Printed Page Header or Footer |
|---|---|---|
| / | / | Inserts a literal forward slash character (/) |
| /c | /c | Center justifies the item |
| /cl | /cl"n" | Sets the font color for text, with the zero-based index of the color, n, in quotes (n can be 0 or more); see the Colors property |
| /dl | /dl | Inserts the date, using the long form |
| /ds | /ds | Inserts the date, using the short form |
| /f | /f"n" | Recalls the previously saved font settings (see /fs in this table), with the zero-based index, n, in quotes (n can be 0 or more) |
| /fb | /fb0 | Turns off bold font type |
| /fb1 | Turns on bold font type | |
| /fi | /fi0 | Turns off italics font type |
| /fi1 | Turns on italics font type | |
| /fk | /fk0 | Turns off strikethrough |
| /fk1 | Turns on strikethrough | |
| /fn | /fn"name" | Sets the name of the font face, with the name of the font in quotes |
| /fs | /fs"n" | Saves the font settings for re-use, with the zero-based index of the font settings, n, in quotes (see /f in this table) |
| /fu | /fu0 | Turns off underline |
| /fu1 | Turns on underline | |
| /fz | /fz"n" | Set the size of the font |
| /g | /g"n" | Inserts a graphic (image), with the zero-based index of the image, n, in quotes (n can be zero or more); see the Images property |
| /l | /l | Left justifies the item (that is the letter l or L, as in Left) |
| /n | /n | Inserts a new line |
| /p | /p | Inserts a page number |
| /pc | /pc | Inserts a page count (the total number of pages in the print job) |
| /r | /r | Right justifies the item |
| /sn | /sn | Inserts the sheet name |
| /tl | /tl | Inserts the time, using the long form |
| /ts | /ts | Inserts the time, using the short form |
If you use multiple control characters, do not put spaces between them. The letters can be lower or upper case; all commands and examples are shown here in lower case for simplicity.
Define the headers and footers (set the Header and Footer properties) before printing the sheet (running the PrintSheet method).
You can specify a color for the text from a list of colors if the color is previously defined in the Colors property.
You can specify an image if the image is previously defined in the Images property.
You can add text including the page number and the total number of pages printed.
You can save the font settings to re-use them later in the header or footer.
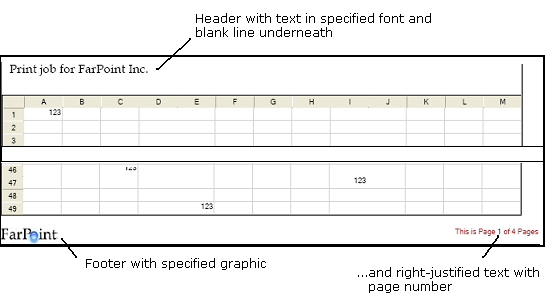
Here is the result of the example code given below.
Using the Properties Window
- At design time, in the Properties window, select the Spread component.
- Select the Sheets property.
- Click the button to display the SheetView Collection Editor.
- In the Members list, select the sheet for which to set the header and footer text.
- In the properties list, double-click the PrintInfo property to display the settings for the PrintInfo class.
- Set the Header and Footer properties to set the header and footer text.
- Click OK to close the editor.
Using a Shortcut
- Create and set the Header and Footer properties for a PrintInfo object.
- Set the Sheet shortcut object PrintInfo property to the PrintInfo object you just created.
Example
This example code prints the sheet with the specified header and footer text.
| C# |
Copy Code
|
|---|---|
// Create PrintInfo object and set properties. FarPoint.Win.Spread.PrintInfo printset = new FarPoint.Win.Spread.PrintInfo(); printset.Colors = new Color[] {Color.Green, Color.Yellow, Color.Gold, Color.Indigo, Color.Brown}; printset.Images = new Image[] {Image.FromFile("C:\\images\\point.jpg"), Image.FromFile("C:\\images\\logo.gif"), Image.FromFile("C:\\images\\icon.jpg")}; printset.Header = "/fn\"Book Antiqua\" /fz\"14\" Print job for FarPoint Inc./n "; printset.Footer = "/g\"1\"/r/cl\"4\"This is page /p of /pc"; // Set the PrintInfo property for the first sheet. fpSpread1.Sheets[0].PrintInfo = printset; // Print the sheet. fpSpread1.PrintSheet(0); |
|
| VB |
Copy Code
|
|---|---|
' Create PrintInfo object and set properties. Dim printset As New FarPoint.Win.Spread.PrintInfo() printset.Colors = New Color() {Color.Green, Color.Yellow, Color.Gold, Color.Indigo, Color.Brown} printset.Images = New Image() {Image.FromFile("D:\images\point.jpg"), Image.FromFile("D:\images\logo.gif"), Image.FromFile("C:\images\icon.jpg")} printset.Header = "/fn""Book Antiqua"" /fz""14"" Print job for FarPoint Inc./n " printset.Footer = "/g""1""/r/cl""4""This is page /p of /pc" ' Set the PrintInfo property for the first sheet. fpSpread1.Sheets(0).PrintInfo = printset ' Print the sheet. fpSpread1.PrintSheet(0) |
|
Using Code
- Create and set the Header and Footer properties for a PrintInfo object.
- Set the SheetView object PrintInfo property to the PrintInfo object you just created.
Example
This example code prints the sheet with the specified header and footer colors and images.
| C# |
Copy Code
|
|---|---|
// Create PrintInfo object and set properties. FarPoint.Win.Spread.PrintInfo pi = new FarPoint.Win.Spread.PrintInfo(); pi.Footer = "This is Page /p/nof /pc Pages"; pi.Header = "Print Job For /nFPT Inc."; pi.Colors = new Color[] {Color.Red, Color.Blue}; pi.Images = new Image[] {Image.FromFile("D:\Corporate.jpg"), Image.FromFile("D:\Building.jpg")}; pi.RepeatColEnd = 25; pi.RepeatColStart = 1; pi.RepeatRowEnd = 25; pi.RepeatRowStart = 1; fpSpread1.ActiveSheet.PrintInfo = pi; |
|
| VB |
Copy Code
|
|---|---|
' Create PrintInfo object and set properties. Dim pi As New FarPoint.Win.Spread.PrintInfo pi.Footer = "This is Page /p/nof /pc Pages" pi.Header = "Print Job For /nFPT Inc." pi.Colors = New Color() {Color.Red, Color.Blue} pi.Images = New Image() {Image.FromFile("D:\Corporate.jpg"), Image.FromFile("D:\Building.jpg")} pi.RepeatColEnd = 25 pi.RepeatColStart = 1 pi.RepeatRowEnd = 25 pi.RepeatRowStart = 1 fpSpread1.ActiveSheet.PrintInfo = pi |
|
Using Code
- Create and set the Header and Footer properties for a PrintInfo object.
- Set the SheetView object PrintInfo property to the PrintInfo object you just created.
Example
This example code prints the sheet with the specified header and footer text.
| C# |
Copy Code
|
|---|---|
// Create PrintInfo object and set properties. FarPoint.Win.Spread.PrintInfo printset = new FarPoint.Win.Spread.PrintInfo(); printset.Header = "/lJobName"; printset.Footer = "/r/p of /pc"; // Create SheetView object and assign it to the first sheet. FarPoint.Win.Spread.SheetView SheetToPrint = new FarPoint.Win.Spread.SheetView(); SheetToPrint.PrintInfo = printset; // Set the PrintInfo property for the first sheet. fpSpread1.Sheets[0] = SheetToPrint; // Print the sheet. fpSpread1.PrintSheet(0); |
|
| VB |
Copy Code
|
|---|---|
' Create PrintInfo object and set properties. Dim printset As New FarPoint.Win.Spread.PrintInfo() printset.Header = "/lJobName" printset.Footer = "/r/p of /pc" ' Create SheetView object and assign it to the first sheet. Dim SheetToPrint As New FarPoint.Win.Spread.SheetView() SheetToPrint.PrintInfo = printset fpSpread1.Sheets(0) = SheetToPrint ' Set the PrintInfo property for the first sheet. fpSpread1.Sheets(0).PrintInfo = printset ' Print the sheet. fpSpread1.PrintSheet(0) |
|
Using the Spread Designer
- Select the sheet tab for the sheet for which you want to set print settings.
- Select the Page Layout option.
- Choose Print Titles.
The Sheet Print dialog appears.
- Click the Header/Footer tab.
- Select the Header or Footer radio button to indicate whether you are setting the header or footer text.
- Type the text for your header or footer in the text box.
You can insert control characters in your text by selecting them from the Control Characters drop-down list box below the text box and then clicking the Add button.
- Click OK to close the Sheet Print Options dialog.
- From the File menu choose Apply and Exit to apply your changes to the component and exit Spread Designer.