转载自一位Spread用户的实际用例,原文地址:http://www.cnblogs.com/wuhuacong/archive/2013/03/26/2981717.html
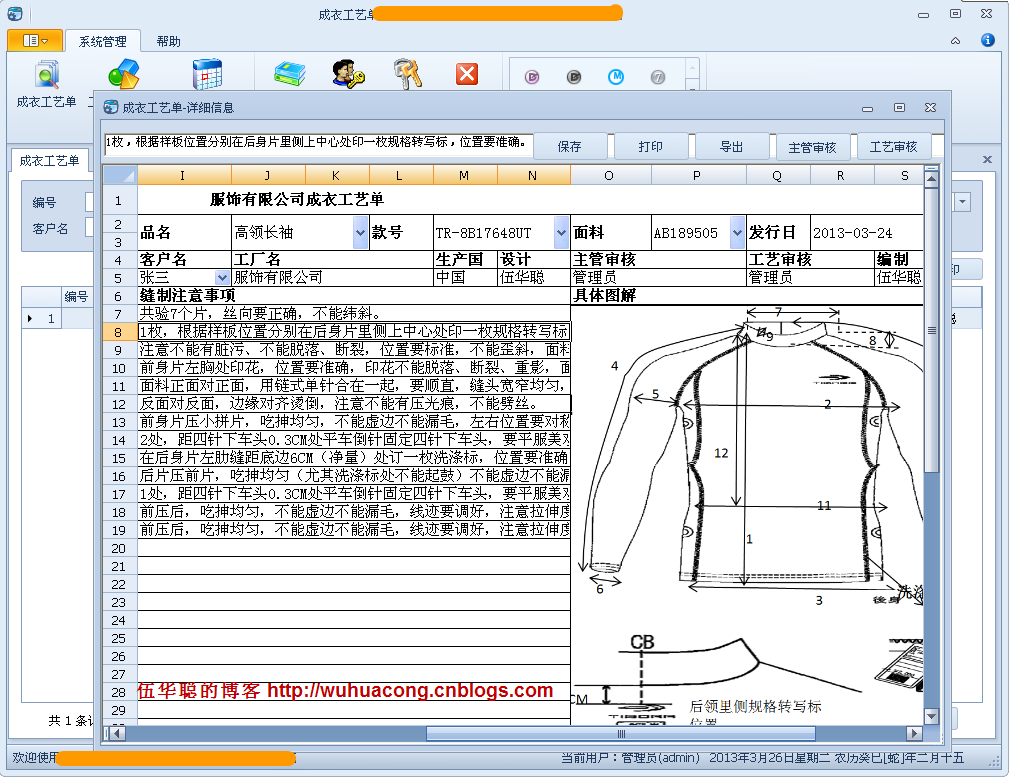
因有一个业务需要在Winform界面中,以类似Excel表格界面中录入相关的数据(毕竟很多时候,客户想利用成熟的软件体验来输入他们想要的东西),其中界面需要录入基础信息,列表信息,图片信息等,综合这些就是例如下面这样的界面效果。本文主要针对如何利用FarPoint Spread表格控件实现类似Excel界面丰富数据的保存及显示,以及在使用过程中的一些经验心得,希望对大家在开发Winform的Excel数据录入和显示方面的开发有一定帮助。

从以上的界面分类可以看到,大致可以分为几个类型的数据,一个是基础字段数据,一个是有多行的列表数据,一个是图片数据,还有就是备注信息的显示录入了。下面我来分类介绍这些功能的实现。
1、类似Excel的列表总体界面设计
首先,这个列表需要在Winform的界面中进行设计,拖入一个Farpoint控件到Winform界面上,设置好布局等属性,然后在右键菜单上启动Spread Designer就可以设计相关的Excel样式表格的内容了。
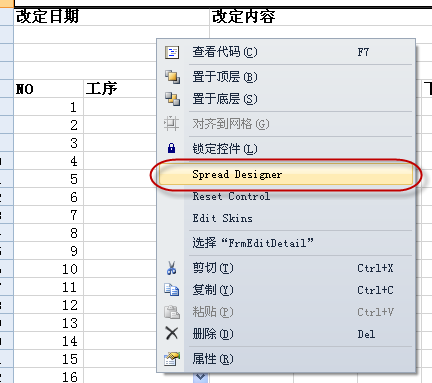
注意,这里界面一般是在窗体中设计的,当然你的内容可以通过复制粘贴的方式,从Excel文档拷贝过来,效果看起来一样的,非常不错。不过,虽然Farpoint Spread控件提供了一个另存为Xml文件的操作,并且可以通过API,Open一个XML文件,不过Open的XML文件后,好像内容不能进行修改的,而且类型CellType也是Null的,所以如果要在一个窗体上动态加载布局好像做不到,至少我没有做到。不过对于开发来说,我们在设计时刻,设计好Excel样式的列表界面,也未尝不是一件好事。
2、下拉列表的绑定
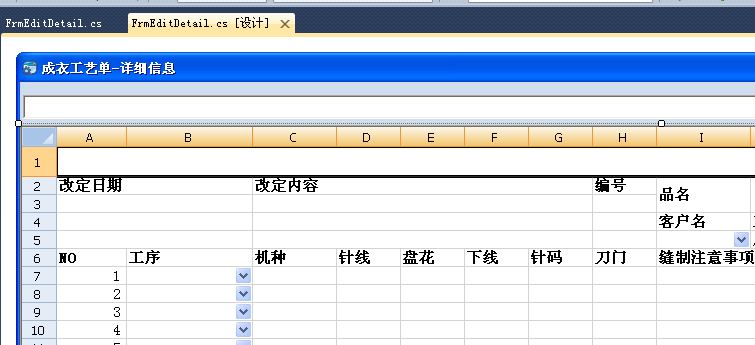
在Excel列表中,我们很多时候,为了输入的方便,需要通过下拉列表方式输入内容,这样可以提高速度和用户体验,但这些内容必须是通过数据库内容进行绑定的,Farpoint Spread控件是如何做到绑定下拉列表的数据的呢。首先Farpoint Spread控件由很多输入的内容,其中就包括有ComoBox类型,如下所示。

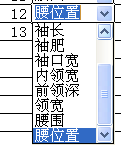
我们在指定下拉的类型后,Excel列表的显示方式也跟着变化为下面样式了。

以上打勾的就是我们下一步需要绑定列表数据的列表了,绑定列表的数据也不麻烦,就是需要明确Cell的序号,绑定给他数据源就可以了,不过说实话,经常要数着Cell的行列号是什么数字,有点不方便。

        private void BindDict() { FarPoint.Win.Spread.Cell cell; //品名
            cell = this.fpSpread1_Sheet1.Cells[1,9]; FarPoint.Win.Spread.CellType.ComboBoxCellType productType = new FarPoint.Win.Spread.CellType.ComboBoxCellType(); productType.BindDictItems("品名"); cell.CellType = productType; //客户名
            cell = this.fpSpread1_Sheet1.Cells[4, 8]; FarPoint.Win.Spread.CellType.ComboBoxCellType customerType = new FarPoint.Win.Spread.CellType.ComboBoxCellType(); customerType.BindDictItems("客户名"); cell.CellType = customerType; //款号
            cell = this.fpSpread1_Sheet1.Cells[1, 12]; FarPoint.Win.Spread.CellType.ComboBoxCellType styleType = new FarPoint.Win.Spread.CellType.ComboBoxCellType(); styleType.BindDictItems("款号"); cell.CellType = styleType; //面料
            cell = this.fpSpread1_Sheet1.Cells[1, 15]; FarPoint.Win.Spread.CellType.ComboBoxCellType materialType = new FarPoint.Win.Spread.CellType.ComboBoxCellType(); materialType.BindDictItems("面料"); cell.CellType = materialType; }
其中代码的BindDictItems我用了扩展方法,所以能通过对象直接调用,具体的函数代码如下所示,就是调用字典业务类获取数据,赋值给Items属性即可,注意其中的Edittable最好选择为true,否则它只是显示里面列表的内容,类似DropdownList那样。
        /// <summary>
        /// 绑定下拉列表控件为指定的数据字典列表 /// </summary>
        /// <param name="combo">下拉列表控件</param>
        /// <param name="dictTypeName">数据字典类型名称</param>
        public static void BindDictItems(this FarPoint.Win.Spread.CellType.ComboBoxCellType combo, string dictTypeName) { Dictionary<string, string> dict = BLLFactory<DictData>.Instance.GetDictByDictType(dictTypeName); List<string> listData = new List<string>(); foreach (string key in dict.Keys) { listData.Add(key); } combo.Items = listData.ToArray(); combo.Editable = true; }
3、如何构造界面自定义录入
为了输入方便,对于一些例如弹出框选择内容,图片编辑,备注内容(很长的时候)的编辑,这些一般来说,我们通过自定义界面来录入比较好,比较Excel样式的界面,录入单元格很小,也有时候实现不了的。所以通过制定控件单元格的单击事件,用来处理特殊录入信息的操作。
this.fpSpread1.CellClick += new FarPoint.Win.Spread.CellClickEventHandler(fpSpread1_CellClick);

展开界面部分给大家看看,就是很把内容
        void fpSpread1_CellClick(object sender, FarPoint.Win.Spread.CellClickEventArgs e) { FarPoint.Win.Spread.Cell cell = this.fpSpread1_Sheet1.Cells[e.Row, e.Column]; fpSpread1_Sheet1.SetActiveCell(e.Row, e.Column); if(e.Column == 14 && e.Row == 6) { #region 图片操作 FrmImageEdit dlg = new FrmImageEdit(); if (!string.IsNullOrEmpty(ID)) { dlg.ID = ID; dlg.IsNew = false; } else { dlg.ID = NewID; dlg.IsNew = true; } dlg.OnDataSaved += new EventHandler(dlgPicture_OnDataSaved); dlg.ShowDialog(); #endregion } else if (e.Column == 1 && e.Row == 42) { #region 注意事项
                object value = this.fpSpread1_Sheet1.Cells[e.Row, e.Column].Value; if (value != null) { FrmEditNote dlg = new FrmEditNote(); dlg.txtContent.Text = value.ToString(); if (dlg.ShowDialog() == System.Windows.Forms.DialogResult.OK) { this.fpSpread1_Sheet1.Cells[e.Row, e.Column].Value = dlg.txtContent.Text; } } #endregion }
例如,对于下拉列表内容,需要进行弹出式选择内容,如下界面所示。

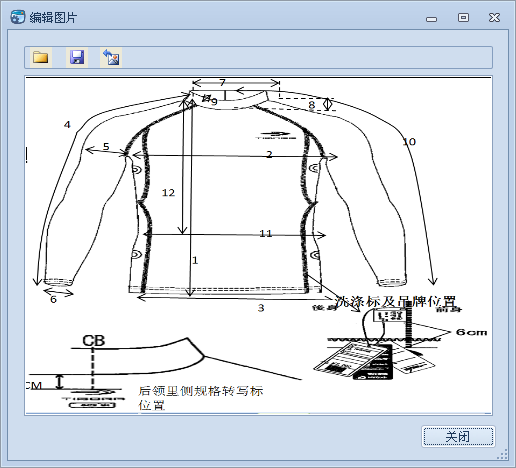
对于图片单元格,单击就可以弹出下面的窗体,方便编辑或者查看。
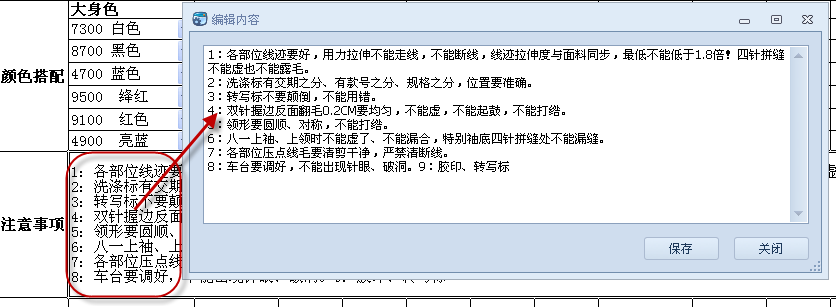
对于备注内容,我们让他弹出一个窗体,更好展现和编辑。
4、数据的显示和保存
对于普通的主表数据字段的显示很简单,把内容赋值给对应的单元格Text属性即可,如下所示。
        /// <summary>
        /// 数据显示的函数 /// </summary>
        public void DisplayData() { if (!string.IsNullOrEmpty(ID)) { #region 显示信息 CraftHeaderInfo info = BLLFactory<CraftHeader>.Instance.FindByID(ID); if (info != null) { this.fpSpread1_Sheet1.Cells[1, 9].Text = info.ProductName; this.fpSpread1_Sheet1.Cells[1, 12].Text = info.StyleNo; this.fpSpread1_Sheet1.Cells[1, 15].Text = info.Material;
保存的时候,把对应的内容保存到实体类进行数据保存操作即可。
        /// <summary>
        /// 编辑或者保存状态下取值函数 /// </summary>
        /// <param name="info"></param>
        private void SetInfo(CraftHeaderInfo info) { info.ProductName = this.fpSpread1_Sheet1.Cells[1, 9].Text;//品名
            info.StyleNo = this.fpSpread1_Sheet1.Cells[1, 12].Text;//款号
            info.Material = this.fpSpread1_Sheet1.Cells[1, 15].Text;//面料
更多数据的时候,我们把内容保存分开,各个函数负责不同的部分即可,在主表保存后继续保存其他部分的内容,例如红色部分就是其他部分的保存操作。
        private void btnSave_Click(object sender, EventArgs e) { if (!string.IsNullOrEmpty(ID)) { CraftHeaderInfo info = BLLFactory<CraftHeader>.Instance.FindByID(ID); if (info != null) { SetInfo(info); try { #region 更新数据
                        bool succeed = BLLFactory<CraftHeader>.Instance.Update(info, info.ID.ToString()); if (succeed) {  SaveProcess(info.ID); SaveAccessories(info.ID); SaveIndicateSize(info.ID); SaveColorPair(info.ID); //可添加其他关联操作
                            ProcessDataSaved(this.btnSave, new EventArgs()); MessageDxUtil.ShowTips("保存成功"); } #endregion } catch (Exception ex) { LogTextHelper.Error(ex); MessageDxUtil.ShowError(ex.Message); } } } else {
例如工艺过程是一个列表数据,保存的时候,需要指定行列的属性进行操作,而且我们添加一个Seq的序列号,用来保存内容的顺序,这样加载的时候,我们就按照这个循序进行加载显示,否则会出现问题。
        private void SaveProcess(string headerId) { string condition = string.Format("Header_ID = '{0}' ", headerId); List<CraftProcessInfo> list = BLLFactory<CraftProcess>.Instance.Find(condition); //(e.Column == 1 && (e.Row >= 6 && e.Row < 30))
            int i = 0; for (int row = 6; row < 30; row++) { CraftProcessInfo info = GetProcess(i++, list); info.Header_ID = headerId; int col = 0; info.HandNo = this.fpSpread1_Sheet1.Cells[row, col++].Text; info.Process = this.fpSpread1_Sheet1.Cells[row, col++].Text; info.Models = this.fpSpread1_Sheet1.Cells[row, col++].Text; info.NeedleWork = this.fpSpread1_Sheet1.Cells[row, col++].Text; info.Flower = this.fpSpread1_Sheet1.Cells[row, col++].Text; info.DownLine = this.fpSpread1_Sheet1.Cells[row, col++].Text; info.PinCode = this.fpSpread1_Sheet1.Cells[row, col++].Text; info.KnifeGate = this.fpSpread1_Sheet1.Cells[row, col++].Text; info.Note = this.fpSpread1_Sheet1.Cells[row, col++].Text; info.Item1 = this.fpSpread1_Sheet1.Cells[row, col++].Text; info.Item2 = this.fpSpread1_Sheet1.Cells[row, col++].Text; info.Item3 = this.fpSpread1_Sheet1.Cells[row, col++].Text; BLLFactory<CraftProcess>.Instance.InsertUpdate(info, info.ID); } }
其中GetProcess函数,就是一个列表中查找对应顺序的内容,如果有,那么我们更新这个对应顺序的内容,如果没有,那么我们认为它是新的数据,这样就新增到数据库中,所以最后用了InserUpdate就是这个道理。其中GetProcess函数逻辑代码如下所示。
        private CraftProcessInfo GetProcess(int index, List<CraftProcessInfo> list) { CraftProcessInfo info = new CraftProcessInfo(); if (list.Count > index) { info = list[index]; } info.Seq = index + 1;//重新调整顺序号

            return info; }
另外注意的时候,有些单元格是合并列的,所以一定要注意算好他的行列号哦。有些地方可能需要跳行。
        private void SaveAccessories(string headerId) { string condition = string.Format("Header_ID = '{0}' ", headerId); List<AccessoriesInfo> list = BLLFactory<Accessories>.Instance.Find(condition); //(e.Column == 1 && (e.Row >= 31 && e.Row < 35))
            int i = 0; for (int row = 31; row < 35; row++) { AccessoriesInfo info = GetAccessories(i++, list); info.Header_ID = headerId; int col = 1; info.Name = this.fpSpread1_Sheet1.Cells[row, col++].Text; info.Consumption = this.fpSpread1_Sheet1.Cells[row, col++].Text; info.Position = this.fpSpread1_Sheet1.Cells[row, col++].Text; col++;//空跳一列
                info.Item1 = this.fpSpread1_Sheet1.Cells[row, col++].Text; col++;//空跳一列
                col++;//空跳一列
                info.Item2 = this.fpSpread1_Sheet1.Cells[row, col++].Text; info.Item3 = this.fpSpread1_Sheet1.Cells[row, col++].Text; info.Item4 = this.fpSpread1_Sheet1.Cells[row, col++].Text; info.Item5 = this.fpSpread1_Sheet1.Cells[row, col++].Text; info.Item6 = this.fpSpread1_Sheet1.Cells[row, col++].Text; BLLFactory<Accessories>.Instance.InsertUpdate(info, info.ID); } }
5、Excel表格的数据打印及导出。
使用这个Farpoint Spread的空间,对于里面的内容进行打印或者导出Excel非常方便,代码也不多,如下所示。
private void btnPrint_Click(object sender, EventArgs e) { PrintInfo pi = new PrintInfo(); pi.Header = "成衣工艺单"; pi.JobName = "成衣工艺单"; pi.Orientation = PrintOrientation.Auto; pi.PageOrder = PrintPageOrder.Auto; pi.ShowPrintDialog = true; pi.PrintNotes = PrintNotes.AtEnd; for (int i = 0; i < this.fpSpread1.Sheets.Count; i++) { pi.ShowPrintDialog = (i == 0); this.fpSpread1.Sheets[i].PrintInfo = pi; fpSpread1.PrintSheet(i); } } private void btnExport_Click(object sender, EventArgs e) { string file = FileDialogHelper.SaveExcel("成衣工艺单.xls"); if (!string.IsNullOrEmpty(file)) { try { bool success = this.fpSpread1.SaveExcel(file); if (success) { if (MessageDxUtil.ShowYesNoAndTips("导出成功,是否打开文件?") == System.Windows.Forms.DialogResult.Yes) { System.Diagnostics.Process.Start(file); } } } catch (Exception ex) { LogTextHelper.Error(ex); MessageDxUtil.ShowError(ex.Message); } } }
导出的效果和界面显示的效果基本上一致的,而且图片等特殊的格式,也是正常保留在Excel里面,总体感觉不错。
最后附上这个系统的一些截图作为补充了解。