从ComponentOne 2017年11月发行版开始,最终用户现在可以使用ExpressionEditor(一个用于输入,评估和传递表达式的WinForms,WPF和UWP的独立桌面控件)轻松编写表达式。
表达式是值的表示形式,广泛用于数据管理,数据可视化和报表定义,以检索,计算,显示,分组,排序,过滤参数和格式化数据。 过去,开发人员编写了所有的表达式,这些表达式在应用程序中大都是硬编码的。
如今,最终用户需要对数据进行更多的控制,根据业务需求进行可视化和分析。 虽然有经验的开发人员可能不会觉得书写表达式很困难,但最终用户在不使用可视编辑器的情况下编写它们并不容易。 ExpressionEditor改变了这一点,给开发者和最终用户一个轻松的表达式写作经验。
虽然最终用户将能够毫不费力地编写表达式,但开发人员还可以利用ExpressionEditor的优势,在更短的时间内编写复杂的表达式,从而从中受益。
ExpressionEditor提供了一个全面的IDE编辑体验,包括智能提示,语法高亮显示,输入无效表达式的错误信息等等。
In this blog, we'll primarily talk about:
- ExpressionEditor的主要特性
- ExpressionEditor的UI
- 设置 ExpressionEditor
- 如何使用ExpressionEditor
主要特性
独立的ExpressionEditor
表达式编辑器通常以带有控件的内置编辑器(如网格,图表和报表)提供,这些编辑器通常用于这些编辑器。 ComponentOne的ExpressionEditor是一个完整的独立编辑器,可以与任何数据绑定控件集成。
智能提示
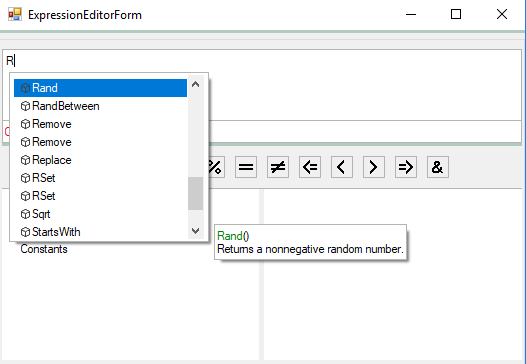
ExpressionEditor减少了记忆函数的需要,并显示它们的定义。 当您开始在编辑器中输入内容时,与可输入字符相匹配的可用函数列表将显示在可选择的下拉列表中,从而加快了您手动执行的搜索速度。
例如,如果键入“r”并等待代码完成列出所有以“r”开头的方法,则Rand()方法将出现在列表顶部。 按下Tab键,并填入Rand。 你可以在“r”后输入“b”,按Tab键后自动添加RandBetween方法。
高亮显示
使用语法突出显示,用户可以更容易地识别表达式中的不同元素。 以不同的颜色显示表达式元素使得表达式更易读,更容易理解。
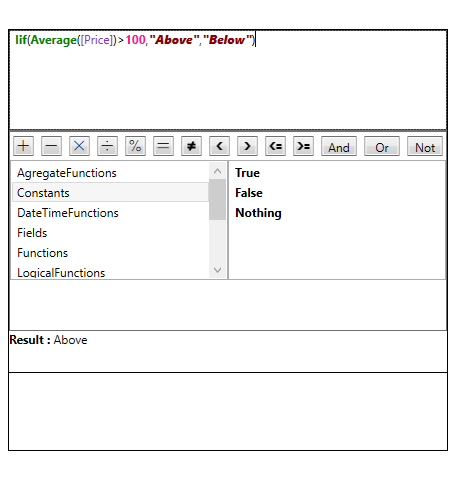
在以下屏幕截图中,表达式元素是颜色编码的:
函数名称是绿色的。
田地是紫色的。
数字是粉红色的。
字符串是棕色的。
200多个内置函数和操作符
ComponentOne ExpressionEditor提供了200多个内置的简单和复杂的函数和操作符。
广义而言,这些功能和操作符分类如下:
- Aggregate functions
- DateTime functions
- Logical functions
- Math functions
- Convert functions
- Text functions
- Operators
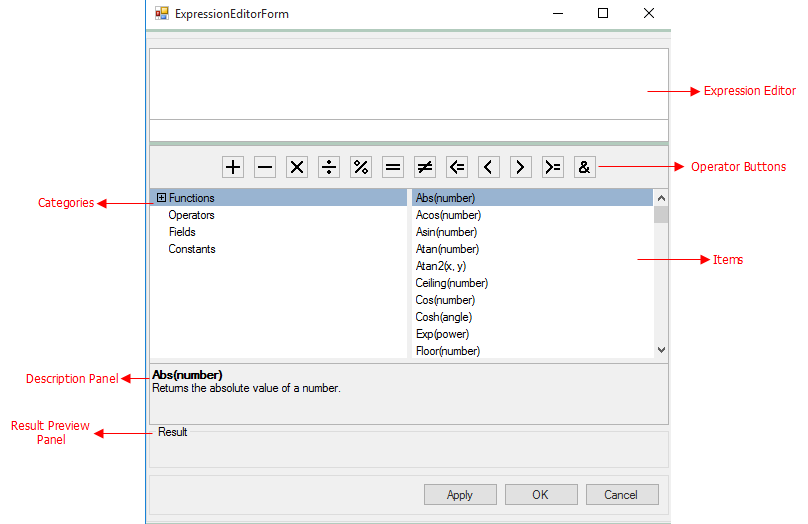
UI Components
ComponentOne的ExpressionEditor主要由两部分组成:
1、C1ExpressionEditor - 这是用户输入表达式的编辑区域。 智能代码完成和语法高亮等功能在该组件中可用。
2、C1ExpressionEditorPanel - 此面板显示内置函数和运算符的分类视图。
设置ExpressionEditor
在本节中,我们将通过集成两个UI组件来完成开发人员需要采取的步骤来为最终用户设置ExpressionEditor。
按照以下步骤在WPF项目中创建一个表达式编辑器:
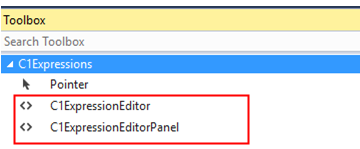
1.使用C1.WPF.ExpressionEditor.4 dll将Expression Editor组件添加到Visual Studio Toolbox中,如下所示。
2.添加对C1.WPF.ExpressionEditor.4和C1.WPF.4 dll的引用并构建项目。
3.打开MainWindow.xaml,并用下面的代码替换现有的XAML:
1: <Window x:Class="ExpressionEditorDemo.MainWindow"
2: xmlns="http://schemas.microsoft.com/winfx/2006/xaml/presentation"
3: xmlns:x="http://schemas.microsoft.com/winfx/2006/xaml"
4: xmlns:mc="http://schemas.openxmlformats.org/markup-compatibility/2006"
5: xmlns:d="http://schemas.microsoft.com/expression/blend/2008"
6: xmlns:c1="http://schemas.componentone.com/winfx/2006/xaml"
7: mc:Ignorable="d"
8: d:DesignHeight="400" d:DesignWidth="500">
9: <Grid>10: <Border BorderBrush="Black" BorderThickness="0,0,01">
11: <Grid Background="White">
12: <Grid.RowDefinitions>13: <RowDefinition Height="Auto"/>
14: <RowDefinition Height="Auto"/>
15: <RowDefinition Height="Auto"/>
16: <RowDefinition Height="Auto"/>
17: </Grid.RowDefinitions>18: <c1:C1ExpressionEditor x:Name="ExpressionEditor" MinHeight="100" Width="{Binding
19: ActualWidth, ElementName=ExpressionPanel}"/>20: <c1:C1ExpressionEditorPanel x:Name="ExpressionPanel" ExpressionEditor="{Binding
21: ElementName=ExpressionEditor}" Grid.Row="1"/>
22: <StackPanel Orientation="Horizontal" Grid.Row="2">
23: <TextBlock Text="Result:" FontWeight="Bold"/>
24: <TextBlock x:Name="Result" Text="" />
25: </StackPanel>26: <TextBlock x:Name="Errors" Grid.Row="3" Foreground="Red" TextWrapping="Wrap"
27: HorizontalAlignment="Left" VerticalAlignment="Top" MinHeight="25" />
28: </Grid> 29: </Border> 30: </Grid> 31: </Window>4.打开MainWindow.xaml.cs并为ExpressionChanged事件添加以下代码:
public MainWindow()
        {
        InitializeComponent();
      ExpressionEditor.ExpressionChanged += ExpressionEditor_ExpressionChanged;
        }

private void ExpressionEditor_ExpressionChanged(object sender, EventArgs e)
         {
           C1ExpressionEditor editor = sender as C1ExpressionEditor;

           if (!editor.IsValid)
           {
             Result.Text = "";
             Errors.Text = "";

          editor.GetErrors().ForEach(x => {Errors.Text += x.FullMessage + "\n";});
              }
              else
          {
                Result.Text = editor.Evaluate()?.ToString();
                Errors.Text = "";

           }
         }
此代码评估在ExpressionEditor中输入的表达式,并在结果文本框中显示有效表达式的结果。 它还显示错误文本框中的无效表达式的错误。
5.构建并运行应用程序。
6.在类别框中输入有效的表达式。
Using ExpressionEditor
在上面的章节中,我们看到了如何设置ExpressionEditor。 接下来,我们将看看如何使用ExpressionEditor和任何数据绑定控件。 对于本博客的范围,我们将简要介绍如何将ExpressionEditor与ComponentOne FlexGrid控件一起使用。
在网格中查看数据时,用户通常需要查看选择性数据。 FlexGrid允许用户通过提供开箱即用的过滤条来根据不同的标准过滤数据。 但是,有时用户可能需要使用运算符跨多个列完成多条件过滤。 在这些场景中,ExpressEditor是有帮助的,因为它使用户能够快速轻松地编写这些类型的过滤器表达式。
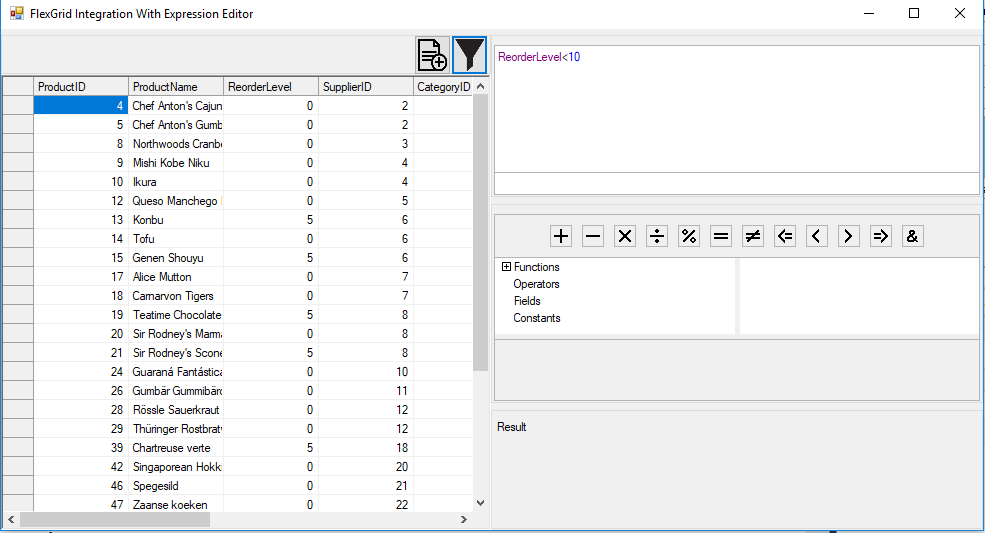
在上面的屏幕截图中,表达式ReorderLevel <10允许最终用户定义一个过滤条件,以仅显示产品的重排序水平低于10的那些行。您可以编写任何表达式来筛选记录,就像我们在本例中所做的一样。
ExpressionEditor与FlexGrid控件的集成可以在设计时完成 - 通过将AllowEditingExpression属性设置为true或通过代码。
使用以下步骤通过代码将ExpressionEditor实现到FlexGrid:
1.要过滤记录,必须将编辑器的数据源设置为C1FlexGrid数据源。
ExpressionEditor.DataSource = flexGrid.CollectionView.CurrentItem;
2.现在,提供一个表达式来使用flexGrid.CollectionView.Filter过滤记录,如下所示:
ExpressionEditor.Expression = "[Price] < 1000";

flexGrid.CollectionView.Filter = new Predicate<object>(Contains);

 private bool Contains(object obj)
   {
               C1ExpressionEditor _editor = new C1ExpressionEditor();
    _editor.Expression = ExpressionEditor.Expression;
    _editor.DataSource = obj as Product;
    var value = _editor.Evaluate();
    var ret = true;
    if (value != null)
        Boolean.TryParse(value.ToString(), out ret);
      return ret;
   }
在下一篇博文中,我们将深入讨论如何使用ExpressionEditor和不同的数据绑定控件。
如果你有疑问,可以到GCDN获得技术支持:
http://gcdn.grapecity.com.cn/showforum-68.html
GCDN:http://gcdn.grapecity.com.cn/
官方网站:/developer