- LeadTools中文图像处理教程(1):更改数据格式 点击进入
- LeadTools中文图像处理教程(2):图像的几何变换 点击进入
- LeadTools中文图像处理教程(3):倾斜校正 点击进入
- LeadTools中文图像处理教程(4):调整图像亮度和对比度 点击进入
- LeadTools中文图像处理教程(5):图像去噪 点击进入
- LeadTools中文图像处理教程(6):检测和增强边缘、线条 点击进入
- LeadTools中文图像处理教程(7):应用艺术效果 点击进入
- LeadTools中文图像处理教程(8):调整色彩 点击进入
- LeadTools中文图像处理教程(9):添加图像至另一个图像 点击进入
- LeadTools中文图像处理教程(10):窗位(仅用于Medical) 点击进入
- LeadTools中文图像处理教程(11):对比图像 点击进入
边缘检测是图像处理和计算机视觉中的基本问题,边缘检测的目的是标识数字图像中亮度变化明显的点。图像属性中的显著变化通常反映了属性的重要事件和变化。这些包括深度上的不连续、表面方向不连续、物质属性变化和场景照明变化。
LeadTools在检测和增强边缘、线条方面提供了多个类和方法,且在检测过程中您可以根据图片的需求设置不同的滤波器,提高最终的检测结果。
本博文包括:
1 创建“检测边缘”应用程序的具体步骤
2 LeadTools“边缘、线条检测和增强”的相关类介绍
3 LeadTools“边缘、线条检测和增强”支持WCF 简介
4 LeadTools“边缘、线条检测和增强”支持WF 简介
创建“检测边缘”应用程序的具体步骤
1. 打开Visual Studio .NET。点击 文件->新建->项目…。打开新建项目对话框后,在模板中选择“Visual C#”或“Visual Basic”,随后选择“Windows窗体应用程序”。在名称栏中输入项目名称“DetectEdgesAndLines”,并使用“浏览”按钮选择您工程的存储路径,点击“确定”。
2. 在“解决方案资源管理器”中,右击“引用”,选择“添加引用”。根据当前工程的 Framework 版本和生成目标平台,选择添加相应的LeadTools控件,例如工程中的版本为 Framework 4.0、生成目标平台是 x86,则浏览选择Leadtools For .NET文件夹” <LEADTOOLS_INSTALLDIR>\Bin\DotNet4\Win32”,选择以下的DLL“:
- Leadtools.dll
- Leadtools.Codecs.dll
- Leadtools.Codecs.Cmp.dll
- Leadtools.ImageProcessing.Color.dll
- Leadtools.ImageProcessing.Effects.dll
- Leadtools.ImageProcessing.SpecialEffects.dll
- Leadtools.WinForms.dll
3. 从工具箱(视图->工具箱),添加12个RadioButton控件(将RadioButton的Text属性依照下表修改),两个Panel控件(Name分别修改为panelBefore和panelAfter)。如下图:
| Name | Text |
| radioButton1 | 使用SharpenCommand 增强边缘 |
| radioButton2 | 使用SpatialFilterCommand 检测边缘或线条 |
| radioButton3 | 使用EdgeDetectorCommand 检测边缘 |
| radioButton4 | 使用EdgeDetectStatisticalCommand 检测边缘 |
| radioButton5 | 使用GlowCommand 绘制彩色边缘 |
| radioButton6 | 使用SmoothEdgesCommand 平滑毛边 |
| radioButton7 | 使用SkeletonCommand 识别骨骼 |
| radioButton8 | 使用IntensityDetectCommand 检测边缘或线条 |
| radioButton9 | 使用UnsharpMaskCommand 锐化图像 |
| radioButton10 | 使用DirectionEdgeStatisticalCommand 检测颜色的变化 |
| radioButton11 | 使用ColoredPencilCommand 应用彩色铅笔效果 |
| radioButton12 | 使用ColoredPencilExtendedCommand 应用彩色铅笔效果 |
4. 切换至Form1的代码视图(右击Form1,选择查看代码),将下面几行代码添加到文件开始处:
1: using Leadtools;2: using Leadtools.Codecs;3: using Leadtools.WinForms;4: using Leadtools.ImageProcessing.Effects;5: using Leadtools.ImageProcessing.SpecialEffects;6: using Leadtools.ImageProcessing.Color;
5. 将以下变量添加至Form1类:
1: private RasterImageViewer beforePic;2: private RasterImageViewer afterPic;3: private RasterCodecs codecs;4: private RasterImage temp;
6. 添加Form1 Load事件句柄,在其中添加以下代码:
1: beforePic = new RasterImageViewer();2: beforePic.BackColor = Color.DarkCyan;3: beforePic.Dock = DockStyle.Fill;4: beforePic.InteractiveMode = RasterViewerInteractiveMode.Pan;5: beforePic.HorizontalAlignMode = RasterPaintAlignMode.Center;6: beforePic.VerticalAlignMode = RasterPaintAlignMode.Center;7: beforePic.AutoResetScaleFactor = false;8: panelBefore.Controls.Add(beforePic);9: beforePic.BringToFront();10:11: afterPic = new RasterImageViewer();12: afterPic.BackColor = beforePic.BackColor;13: afterPic.Dock = beforePic.Dock;14: afterPic.InteractiveMode = beforePic.InteractiveMode;15: afterPic.HorizontalAlignMode = beforePic.HorizontalAlignMode;16: afterPic.VerticalAlignMode = beforePic.VerticalAlignMode;17: afterPic.AutoResetScaleFactor = beforePic.AutoResetScaleFactor;18: panelAfter.Controls.Add(afterPic);19: afterPic.BringToFront();20:21: codecs = new RasterCodecs();22: codecs.ThrowExceptionsOnInvalidImages = true;
7. 双击radioButton1,在radioButton1 CheckedChanged事件句柄中添加以下代码:
(本段代码为SharpenCommand类的使用)
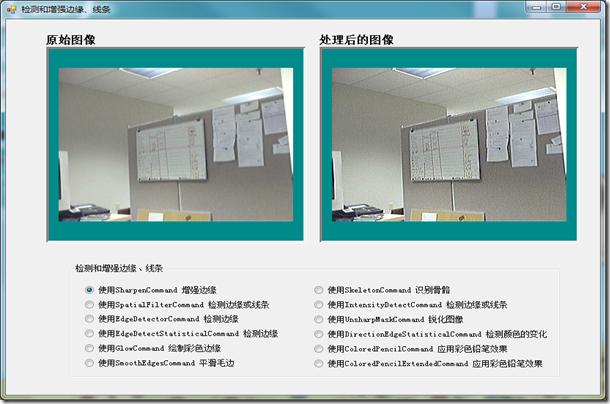
1: beforePic.Image = codecs.Load(Path.Combine(Application.StartupPath, @"..\..\Pic\Master.jpg"));2: temp = beforePic.Image.Clone();3: // Prepare the command4: SharpenCommand command = new SharpenCommand();5: //Increase the sharpness by 25 percent of the possible range.6: command.Sharpness = 950;7: command.Run(temp);8: afterPic.Image = temp;9: codecs.Save(temp, Path.Combine(Application.StartupPath, @"..\..\Pic\SharpeCommand.jpg"), RasterImageFormat.Jpeg, 24);
8. 双击radioButton2,在radioButton2 CheckedChanged事件句柄中添加以下代码:
(本段代码为SpatialFilterCommand类的使用)
1: beforePic.Image = codecs.Load(Path.Combine(Application.StartupPath, @"..\..\Pic\Master.jpg"));2: temp = beforePic.Image.Clone();3:4: SpatialFilterCommand command = new SpatialFilterCommand(SpatialFilterCommandPredefined.PrewittHorizontal);5:6: command.Run(temp);7: afterPic.Image = temp;
9. 双击radioButton3,在radioButton3 CheckedChanged事件句柄中添加以下代码:
(本段代码为EdgeDetectorCommand类的使用)
1: beforePic.Image = codecs.Load(Path.Combine(Application.StartupPath, @"..\..\Pic\Master.jpg"));2: temp = beforePic.Image.Clone();3: // Prepare the command4: EdgeDetectorCommand command = new EdgeDetectorCommand();5: command.Threshold = 60;6: command.Filter = EdgeDetectorCommandType.SobelBoth;7: //find the edges of the image.8: command.Run(temp);9: afterPic.Image = temp;10: codecs.Save(temp, Path.Combine(Application.StartupPath, @"..\..\Pic\EdgeDetectorCommand.jpg"), RasterImageFormat.Jpeg, 24);
10. 双击radioButton4,在radioButton4 CheckedChanged事件句柄中添加以下代码:
(本段代码为EdgeDetectStatisticalCommand类的使用)
1: beforePic.Image = codecs.Load(Path.Combine(Application.StartupPath, @"..\..\Pic\Master.jpg"));2: temp = beforePic.Image.Clone();3:4: EdgeDetectStatisticalCommand command = new EdgeDetectStatisticalCommand();5: command.Dimension = 15;6: command.Threshold = 50;7: command.EdgeColor = new RasterColor(255, 255, 255);8: command.BackGroundColor = new RasterColor(0, 0, 0);9:10: command.Run(temp);11: afterPic.Image = temp;12: codecs.Save(temp, Path.Combine(Application.StartupPath, @"..\..\Pic\EdgeDetectStatisticalCommand.jpg"), RasterImageFormat.Jpeg, 24);13:
11. 双击radioButton5,在radioButton5 CheckedChanged事件句柄中添加以下代码:
(本段代码为GlowCommand类的使用)
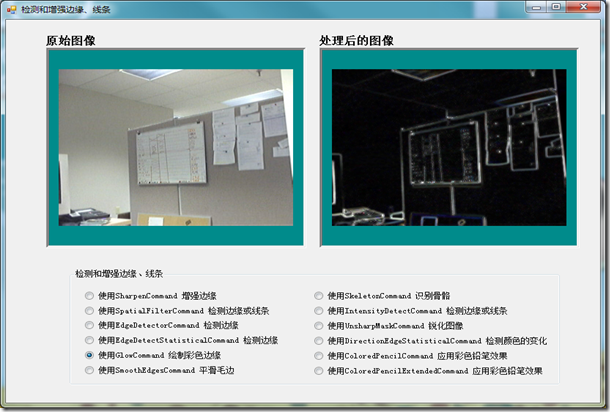
1: beforePic.Image = codecs.Load(Path.Combine(Application.StartupPath, @"..\..\Pic\Master.jpg"));2: temp = beforePic.Image.Clone();3: // Prepare the command4: GlowCommand command = new GlowCommand();5: command.Dimension = 5;6: command.Brightness = 3;7: command.Threshold = 0;8: // Apply glow effect on the image.9: command.Run(temp);10: afterPic.Image = temp;11: codecs.Save(temp, Path.Combine(Application.StartupPath, @"..\..\Pic\GlowCommand.jpg"), RasterImageFormat.Jpeg, 24);
12. 双击radioButton6,在radioButton6 CheckedChanged事件句柄中添加以下代码:
(本段代码为SmoothEdgesCommand类的使用)
1: beforePic.Image = codecs.Load(Path.Combine(Application.StartupPath, @"..\..\Pic\Master.jpg"));2: temp = beforePic.Image.Clone();3: // Prepare the command4: SmoothEdgesCommand command = new SmoothEdgesCommand();5: command.Amount = 75;6: command.Threshold = 0;7: // Apply the Smooth Edge effect to the image.8: command.Run(temp);9: afterPic.Image = temp;
13. 双击radioButton7,在radioButton7 CheckedChanged事件句柄中添加以下代码:
(本段代码为SkeletonCommand类的使用)
1: beforePic.Image = codecs.Load(Path.Combine(Application.StartupPath, @"..\..\Pic\Master.jpg"));2: temp = beforePic.Image.Clone();3: // Prepare the command4: SkeletonCommand command = new SkeletonCommand();5: command.Threshold = 128;6: command.Run(temp);7: afterPic.Image = temp;
14. 双击radioButton8,在radioButton8 CheckedChanged事件句柄中添加以下代码:
(本段代码为IntensityDetectCommand类的使用)
1: beforePic.Image = codecs.Load(Path.Combine(Application.StartupPath, @"..\..\Pic\Master.jpg"));2: temp = beforePic.Image.Clone();3: //准备命令4: IntensityDetectCommand command = new IntensityDetectCommand();5: //应用滤波器6: command.LowThreshold = 128;7: command.HighThreshold = 255;8: command.InColor = new RasterColor(255, 255, 255);9: command.OutColor = new RasterColor(0, 0, 0);10: command.Channel = IntensityDetectCommandFlags.Master;11: command.Run(temp);12: afterPic.Image = temp;
15. 双击radioButton9,在radioButton9 CheckedChanged事件句柄中添加以下代码:
(本段代码为UnsharpMaskCommand类的使用)
1: beforePic.Image = codecs.Load(Path.Combine(Application.StartupPath, @"..\..\Pic\Master.jpg"));2: temp = beforePic.Image.Clone();3:4: UnsharpMaskCommand command = new UnsharpMaskCommand();5: command.Amount = 200;6: command.Radius = 15;7: command.Threshold = 50;8: command.ColorType = UnsharpMaskCommandColorType.Rgb;9: command.Run(temp);10: afterPic.Image = temp;
16. 双击radioButton10,在radioButton10 CheckedChanged事件句柄中添加以下代码:
(本段代码为DirectionEdgeStatisticalCommand类的使用)
1: beforePic.Image = codecs.Load(Path.Combine(Application.StartupPath, @"..\..\Pic\Master.jpg"));2: temp = beforePic.Image.Clone();3:4: DirectionEdgeStatisticalCommand command = new DirectionEdgeStatisticalCommand();5: command.Dimension = 15;6: command.Threshold = 128;7: command.Angle = 4500;8: command.EdgeColor = new RasterColor(255, 255, 255);9: command.BackGroundColor = new RasterColor(0, 0, 0);10: command.Run(temp);11: afterPic.Image = temp;
17. 双击radioButton11,在radioButton11 CheckedChanged事件句柄中添加以下代码:
(本段代码为ColoredPencilCommand类的使用)
1: beforePic.Image = codecs.Load(Path.Combine(Application.StartupPath, @"..\..\Pic\Master.jpg"));2: temp = beforePic.Image.Clone();3:4: ColoredPencilCommand command = new ColoredPencilCommand();5: command.Ratio = 50;6: command.Dimension = 3;7: command.Run(temp);8: afterPic.Image = temp;
18. 双击radioButton12,在radioButton12 CheckedChanged事件句柄中添加以下代码:
(本段代码为ColoredPencilExtendedCommand类的使用)
1: beforePic.Image = codecs.Load(Path.Combine(Application.StartupPath, @"..\..\Pic\Master.jpg"));2: temp = beforePic.Image.Clone();3:4: ColoredPencilExtendedCommand command = new ColoredPencilExtendedCommand();5: command.Size = 5;6: command.Strength = 4;7: command.Threshold = 0;8: command.PencilRoughness = 250;9: command.StrokeLength = 15;10: command.PaperRoughness = 100;11: command.Flags = ColoredPencilExtendedCommandFlags.Artistic;12: command.Run(temp);13: afterPic.Image = temp;
19.编译运行程序,本DEMO分别使用了LeadTools的12个类检测增强图像的边缘和线条,结果如下图:
若想了解更多LeadTools边缘检测和增强的相关类和说明,请继续浏览文章的下一部分!
DEMO下载:
本博文Demo提供了检测增强边缘和线条的功能,LeadTools还有很多类可以对图像进行类似处理,若你想尝试,欢迎下载LeadTools全功能试用版,在本文中的例子代码上进行修改。很简单的,你来试试吧。
LeadTools中检测边缘线条、增强边缘线条的相关方法介绍
|
此类在图像中专门用于强调边缘(在亮度上改变)。这是一个为了期望的效果可以单独使用的高级方法。 |
|
|
此类提供了检测边缘或线条的预设滤波器。(您也可以定义自己的滤波器)。这些滤波器可以单独在应用程序中使用,例如分析图像的工业检查系统。它们也可以创建图像,可与原始图像合并来改变线条或边缘的外观。预设滤波器的介绍见下张表格(滤波器表)。 |
|
|
此类将特定的边缘滤波器应用于特定的图像。可用的边缘滤波器包括:Sobel vertical, Sobel horizontal, Sobel all, Laplacian vertical and horizontal, Laplacian diagonal, Gradient North, Gradient South及更多。此类可以检测图像中的边缘,然后用计算的值替换边缘的值。 |
|
|
此类将一个统计滤波器应用到图像中,进行边缘检测,这个滤波器可以在每个像素的所有方向分析出颜色的变化。 |
|
|
此类可在一个闪耀着霓虹灯般光芒的图像中制作彩色边缘。 |
|
|
此类用于图像毛边的平滑处理。 |
|
|
此类在二值图像中可以找出骨骼的区域或对象。白色代表对象,黑色代表背景。如果图像不是1位图像,在寻找骨骼前,可使用阈值将图像转换为二值图像。 |
|
|
此类未使用滤波器检测边缘或线,但对于有的图像,它在检测图像中明显亮和明显暗的边缘和线条时比滤波器更有效。 |
|
|
此类在锐化图像时,首先创建图像的模糊版本。对于图像中的每个像素,可确定原始像素值和模糊像素值间的差别。如果这个差别大于某个阈值时,原始像素值会被修改,达到锐化图像的目标。 |
|
|
此类使用统计指数在特定方向上检测颜色的变化。它与 EdgeDetectStatisticalCommand相似,但此类允许您指定方向角。 |
|
|
应用此类后,图像的效果看起来像用彩色铅笔绘制的。 |
|
|
和ColoredPencilCommand类似,应用后图像的效果看起来像用彩色铅笔绘制的。但此类的参数更多。 |
选择预设的滤波器是非常主观的,主要依赖于您的应用程序。这些滤波器使用了标准的算法,其中一些具有类似的目的。因此您可能需要测试,为您的应用程序选择一个合适的滤波器。下面就为大家简单介绍预设的滤波器(滤波器表):
|
滤波器 |
目标 |
|
Emboss |
创建一个具有浮雕效果的图像。(它用于艺术效果中,在这里列出它是因为它是预设滤波器的一种) |
|
Gradient directional |
从八个特定方向的任意一个开始检测边缘。所有不在检测出的边缘上的像素均转换为黑色。 |
|
Prewitt |
检测水平或垂直边缘。所有不在检测出的边缘上的像素均转换为黑色。 |
|
Sobel |
检测水平或垂直边缘。所有不在检测出的边缘上的像素均转换为黑色。(Sobel算子和Prewitt算子的使用相同,但是它们的算法是不同的) |
|
Shift-and-difference |
检测水平、垂直或对角线边缘。所有不在检测出的边缘上的像素均转换为黑色。 |
|
Laplacian |
检测线。有三个滤波器和三个双向滤波器。所有不在检测出的边缘上的像素均转换为黑色。 |
|
Line-segment |
检测线段。可能的方向有:水平、垂直、从左到右的对角线和从右到左的对角线。您可以使用这个滤波器在图像中找到线的间断点。 |
为了克服这些过滤器的方向性限制,您可以以不同的方式合并使用过滤器处理过的图像。例如,您可以在图像的三个副本上分别应用三个不同方向的Laplacian滤波器,最后使用CombineCommand类合并它们,创建具有所有检测线的图像。
支持WCF
|
此类在图像中专门用于强调边缘(在亮度上改变)。这是一个为了期望的效果可以单独使用的高级方法。 |
|
|
此类提供了检测边缘或线条的预设滤波器。(您也可以定义自己的滤波器)。这些滤波器可以单独在应用程序中使用,例如分析图像的工业检查系统。它们也可以创建图像,可与原始图像合并来改变线条或边缘的外观。预设滤波器的介绍见上张表格(滤波器表)。 |
|
|
此类将特定的边缘滤波器应用于特定的图像。可用的边缘滤波器包括:Sobel vertical, Sobel horizontal, Sobel all, Laplacian vertical and horizontal, Laplacian diagonal, Gradient North, Gradient South及更多。此类可以检测图像中的边缘,然后用计算的值替换边缘的值。 |
|
|
此类未使用滤波器检测边缘或线,但对于有的图像,它在检测图像中明显亮和明显暗的边缘和线条时比滤波器更有效。 |
|
|
此类在锐化图像时,首先创建图像的模糊版本。对于图像中的每个像素,可确定原始像素值和模糊像素值间的差别。如果这个差别大于某个阈值时,原始像素值会被修改,达到锐化图像的目标。 |
支持WF
|
此类在图像中专门用于强调边缘(在亮度上改变)。这是一个为了期望的效果可以单独使用的高级方法。 |
|
|
此类提供了检测边缘或线条的预设滤波器。(您也可以定义自己的滤波器)。这些滤波器可以单独在应用程序中使用,例如分析图像的工业检查系统。它们也可以创建图像,可与原始图像合并来改变线条或边缘的外观。预设滤波器的介绍见上张表格(滤波器表)。 |
|
|
此类将特定的边缘滤波器应用于特定的图像。可用的边缘滤波器包括:Sobel vertical, Sobel horizontal, Sobel all, Laplacian vertical and horizontal, Laplacian diagonal, Gradient North, Gradient South及更多。此类可以检测图像中的边缘,然后用计算的值替换边缘的值。 |
|
|
此类未使用滤波器检测边缘或线,但对于有的图像,它在检测图像中明显亮和明显暗的边缘和线条时比滤波器更有效。 |
|
|
此类在锐化图像时,首先创建图像的模糊版本。对于图像中的每个像素,可确定原始像素值和模糊像素值间的差别。如果这个差别大于某个阈值时,原始像素值会被修改,达到锐化图像的目标。 |
若您在使用LeadTools的过程中遇到任何问题,欢迎在葡萄城开发者社区LeadTools板块提问,我们的专业技术团队期待您的到来!


.K1AHo.png)


