对于C1FlexGrid,如何给单元格设置样式(包括前景色,背景色)是提出最多的问题。
本文就通过示例介绍如何给C1FlexGrid设置特定单元格的样式。
通常情况,我们通过C1FlexGrid的CellFactory实现样式的设置,通过重写ApplyCellStyles方法来实现。
数据绑定
首先,我们需要对c1flexgrid进行数据绑定显示数据。
在这里,我们假设绑定一个DataTable,代码如下:
            DataTable dt = new DataTable();
            dt.Columns.Add("CurrencyCode", typeof(int));
            dt.Columns.Add("Industry", typeof(string));
            dt.Columns.Add("Market", typeof(string));
            dt.Columns.Add("Sector", typeof(int));
            dt.Columns.Add("Total", typeof(double));
            dt.Columns.Add("SecurityType", typeof(string));
            dt.Rows.Add(1, "Ind1", "M1", 100, null, "type1");
            dt.Rows.Add(2, "Ind2", "M2", 200, null, "type2");
            dt.Rows.Add(3, "Ind3", "M3", 300, 12345678.1234567, "type3");
            dt.Rows.Add(4, "Ind4", "M4", 400, 12345678.1234567, "type4");
            dt.Rows.Add(5, "Ind5", "M5", 500, 12345678.1234567, "type5");
            dt.Rows.Add(6, "Ind6", "M6", 600, 12345678.1234567, "type6");
            dt.Rows.Add(7, "Ind7", "M7", 700, 12345678.1234567, "type7");
            dt.Rows.Add(8, "Ind8", "M8", 800, 12345678.1234567, "type8");
            dt.Rows.Add(9, "Ind9", "M9", 900, 12345678.1234567, "type9");

            flex.ItemsSource = dt.AsDataView();
设置CellFactory
自定义一个MyCellFactory类继承CellFactory,并且设置给C1FlexGrid。
代码如下:
flex.CellFactory = new MyCellFactory();
重写ApplyCellStyles
通过重写CellFactory的ApplyCellStyles方法,来实现指定单元格的样式设置。
通过bdr拿到单元格的TextBlock,并且设置TextBlock的文字样式(比如FontWeight,FontSize)。以及bdr设置背景色。
代码参考:
   public override void ApplyCellStyles(C1FlexGrid grid, CellType cellType, CellRange range, Border bdr)
        {
           var columnindex = range.Column;
            var rowindex = range.Row;
           if ((columnindex == 2) && (rowindex == 3))
            {
               //set the customizations on the cell when it is not selected
                bdr.Background = new SolidColorBrush(Colors.Red);
                bdr.BorderBrush = Brushes.Blue;
                bdr.BorderThickness = new Thickness(1);
            }
        }
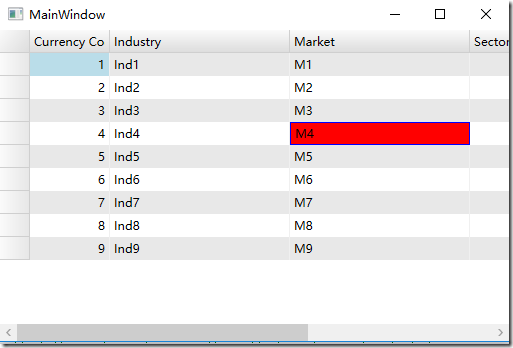
这个时候运行代码,就发现column=2, row=3的单元格的样式已经改变,如图:
代码改进
这个时候样式已经设置完成。但是当选择到指定的单元格的时候,这个样式会保持不变。
有的用户就希望原本的Selection 的样式能够保留。
我们通过改进代码来实现这个需求:
这个时候,我们需要添加一个判断条件,来判断指定单元格是否被选择。
判断条件:
if (columnindex == grid.Selection.Column && rowindex == grid.Selection.Row)
如果指定单元格被选择,就将背景色设置为选择背景色。
这个时候的改进方法如下:
   public override void ApplyCellStyles(C1FlexGrid grid, CellType cellType, CellRange range, Border bdr)
        {
           var columnindex = range.Column;
           var rowindex = range.Row;

            //check if the cell is selected or not
            if ((columnindex == 2) && (rowindex == 3))
            {
                if (columnindex == grid.Selection.Column && rowindex == grid.Selection.Row)
                {
                    //set a different backcolor and border brush
                    //when the cell is selected
                    //leave the remaining customizations as it is
                    bdr.Background = grid.SelectionBackground;
                }
                else
                {
                    bdr.Background = new SolidColorBrush(Colors.Red);
                    bdr.BorderBrush = Brushes.Blue;
                    bdr.BorderThickness = new Thickness(1);
                }
            }

        }
至此,就实现了指定单元格的背景色设置。
本文的示例请下载:
本文完,如果有兴趣请关注更多资源。
更多资源
C1FlexGrid在线英文产品文档地址:
http://helpcentral.componentone.com/nethelp/c1wpfchart/#!Documents/componentonechartforwpf.htm
如果你对C1FlexGrid感兴趣,请到我们的官网下载最新版本:/download/?pid=6
如果你有疑问,可以到GCDN论坛获得技术支持:http://gcdn.grapecity.com.cn/showforum-138.html
