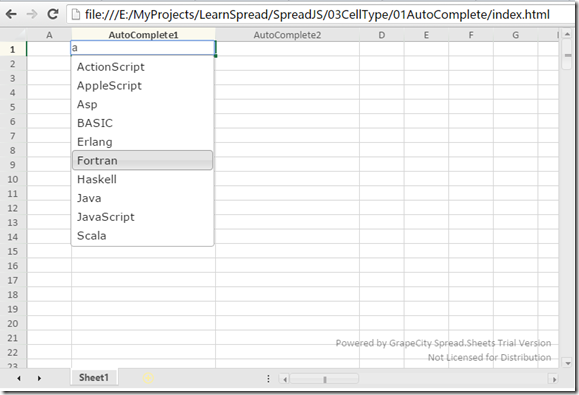
SpareadJS强大的拓展性让我们可以轻而易举的开发出满足项目需求的内容,在这个系列中我们将为大家展示各式各样的自定义单元格。文中自定义单元格类型都以TypeScript完成,有关TypeScript的使用可参考用Visual Studio Code + TypeScript 完成自定义颜色选择器单元格。
本文将介绍如何实现AutoComplete单元格。关于jQuery UI Autocomplete的详细使用请参考http://jqueryui.com/autocomplete/。
1. 添加AutoCompleteCellType.ts文件
/// <reference path="../lib/SpreadJS/definition/gcspread.sheets.d.ts"/>
// http://jqueryui.com/autocomplete/
declare var $;
class AutoCompleteCellType extends GcSpread.Sheets.CustomCellType {
    availableTags = [
    ];
    constructor(availableTags: Array<string>) {
        super();
        if (availableTags && availableTags.length > 0) {
            this.availableTags = availableTags;
        }
    }
    createEditorElement(context) {
        //Create input presenter.
        return document.createElement("input");
    }
    activateEditor(editorContext: any, cellStyle: GcSpread.Sheets.Style, cellRect: GcSpread.Sheets.Rect, context?: any) {
        var $editor = $(editorContext);
        super.activateEditor(editorContext, cellStyle, cellRect, context);
        $editor.css("position", "absolute");
        $editor.attr("gcUIElement", "gcEditingInput");
        $editor.autocomplete({
            source: this.availableTags
        }); // initialize autocomplete widget
        $editor.autocomplete("widget").attr("gcUIElement", "gcEditingInput"); // keep focus when mouse down on dropdown
        return $editor;
    }
    deactivateEditor(editorContext: any, context?: any) {
        if (editorContext) {
            var $editor = $(editorContext);
            // $editor.autocomplete("hide");
            $editor.autocomplete("destroy");
        }
        super.deactivateEditor(editorContext, context);
    }
    setEditorValue(editorContext: any, value: any, context?: any) {
        $(editorContext).val(value);
    }
    getEditorValue(editorContext: any, context?: any) {
        return $(editorContext).val();
    }
    updateEditor(editorContext: any, cellStyle: GcSpread.Sheets.Style, cellRect: GcSpread.Sheets.Rect, context?: any) {
        if (editorContext) {
            var $editor = $(editorContext);
            $editor.css("width", cellRect.width);
            $editor.css("height", cellRect.height);
        }
    }
    isReservedKey(event: KeyboardEvent, context?: any): boolean {
        if (context.isEditing && (event.keyCode == 40 || event.keyCode == 38)) { // reserve up/down key to select items
            return true;
        }
        return false;
    }
    setAutocompleteSource(source: Array<string>) {
        this.availableTags = source;
    }
    getAutocompleteSource(): Array<string> {
        return this.availableTags;
    }
}
2. 使用AutoCompleteCellType
var ns = GcSpread.Sheets;
$(function() {
    var availableTags = [
        "ActionScript",
        "AppleScript",
        "Asp",
        "BASIC",
        "C",
        "C++",
        "Clojure",
        "COBOL",
        "ColdFusion",
        "Erlang",
        "Fortran",
        "Groovy",
        "Haskell",
        "Java",
        "JavaScript",
        "Lisp",
        "Perl",
        "PHP",
        "Python",
        "Ruby",
        "Scala",
        "Scheme"
    ];
    var spread = new GcSpread.Sheets.Spread(document.getElementById("ss"), { sheetCount: 1 });
    var sheet = spread.getActiveSheet();
    sheet.isPaintSuspended(true);
    sheet.setValue(0, 1, "AutoComplete1", ns.SheetArea.colHeader);
    sheet.getColumn(1).cellType(new AutoCompleteCellType(availableTags)).width(200);

    sheet.setValue(0, 2, "AutoComplete2", ns.SheetArea.colHeader);
    var autoCompleteCellType = new AutoCompleteCellType();
    autoCompleteCellType.setAutocompleteSource(availableTags);
    sheet.getColumn(2).cellType(autoCompleteCellType).width(200);

    sheet.isPaintSuspended(false);
});
3. HTML代码
<html>
<head>
    <meta charset="UTF-8">
    <link href="./lib/bootstrap-3.3.5/css/bootstrap.min.css" rel="stylesheet" />
    <link href="http://demo.grapecity.com.cn/SpreadJS/TutorialSample/external/spreadjs/css/gcspread.sheets.excel2013white.9.40.20153.0.css" rel="stylesheet" />
    <link href="http://cdnjs.cloudflare.com/ajax/libs/jqueryui/1.10.0/css/smoothness/jquery-ui-1.10.0.custom.min.css" rel="stylesheet" />
</head>
<body>
    <div id="ss" style="width:800px;height:500px"></div>
    <script src="http://code.jquery.com/jquery-latest.js"></script>
    <script src="./lib/bootstrap-3.3.5/js/bootstrap.min.js"></script>
    <script src="http://cdnjs.cloudflare.com/ajax/libs/jqueryui/1.10.0/jquery-ui.js"></script>
    <script src="http://demo.grapecity.com.cn/SpreadJS/TutorialSample/external/spreadjs/gcspread.sheets.all.9.40.20153.0.min.js"></script>
    <script src="./src/AutoCompleteCellType.js"></script>
    <script src="./index.js"></script>
</body>
</html>
在第二三列单元格中输入内容即可查看效果。
示例下载:


