- LeadTools中文图像处理教程(1):更改数据格式 点击进入
- LeadTools中文图像处理教程(2):图像的几何变换 点击进入
- LeadTools中文图像处理教程(3):倾斜校正 点击进入
- LeadTools中文图像处理教程(4):调整图像亮度和对比度 点击进入
- LeadTools中文图像处理教程(5):图像去噪 点击进入
- LeadTools中文图像处理教程(6):检测和增强边缘、线条 点击进入
- LeadTools中文图像处理教程(7):应用艺术效果 点击进入
- LeadTools中文图像处理教程(8):调整色彩 点击进入
- LeadTools中文图像处理教程(9):添加图像至另一个图像 点击进入
- LeadTools中文图像处理教程(10):窗位(仅用于Medical) 点击进入
- LeadTools中文图像处理教程(11):对比图像 点击进入
LeadTools是全球最优秀的图形、图像处理开发包,它可以处理各种格式的文件,并包含所有图形、图像的处理和转换功能,支持多种平台,包括Raster Imaging、Document Imaging、Medical Imaging和Multimedia Imaging四个产品系列。
在图像处理中,LeadTools可以对图像应用各种不同的艺术效果,如在图像上创建三维纹理图案,在图像中添加砖的纹理效果,添加浮雕效果,增加海报效果,添加马赛克效果等等。
本博文概览:
1 创建“艺术效果”应用程序的具体步骤
2 LeadTools“应用艺术效果”相关的类和说明
创建“艺术效果”应用程序的步骤
1. 打开Visual Studio .NET。点击 文件->新建->项目…。打开新建项目对话框后,在模板中选择“Visual C#”或“Visual Basic”,随后选择“Windows窗体应用程序”。在名称栏中输入项目名称“ApplyArtisticEffects”,并使用“浏览”按钮选择您工程的存储路径,点击“确定”。
2. 在“解决方案资源管理器”中,右击“引用”,选择“添加引用”。根据当前工程的 Framework 版本和生成目标平台,选择添加相应的LeadTools控件,例如工程中的版本为 Framework 4.0、生成目标平台是 x86,则浏览选择Leadtools For .NET文件夹” <LEADTOOLS_INSTALLDIR>\Bin\DotNet4\Win32”,选择以下的DLL“:
- Leadtools.dll
- Leadtools.Codecs.dll
- Leadtools.Codecs.Cmp.dll
- Leadtools.ImageProcessing.Effects.dll
- Leadtools.ImageProcessing.SpecialEffects.dll
- Leadtools.WinForms.dll
3. 从工具箱(视图->工具箱),添加12个RadioButton控件(将RadioButton的Text属性依照下表修改),两个Panel控件(Name分别修改为panelBefore和panelAfter)。如下图:
| Name | Text |
| radioButton1 | 使用AddNoiseCommand 添加噪声 |
| radioButton2 | 使用AgingCommand 添加老电影效果 |
| radioButton3 | 使用BendCommand 处理图像 |
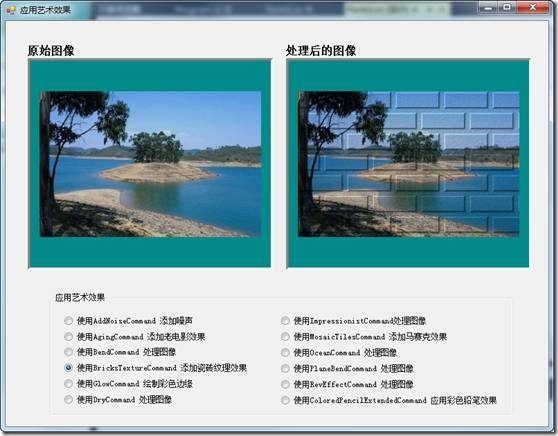
| radioButton4 | 使用BricksTextureCommand 添加瓷砖纹理效果 |
| radioButton5 | 使用GlowCommand 绘制彩色边缘 |
| radioButton6 | 使用DryCommand 处理图像 |
| radioButton7 | 使用ImpressionistCommand处理图像 |
| radioButton8 | 使用MosaicTilesCommand 添加马赛克效果 |
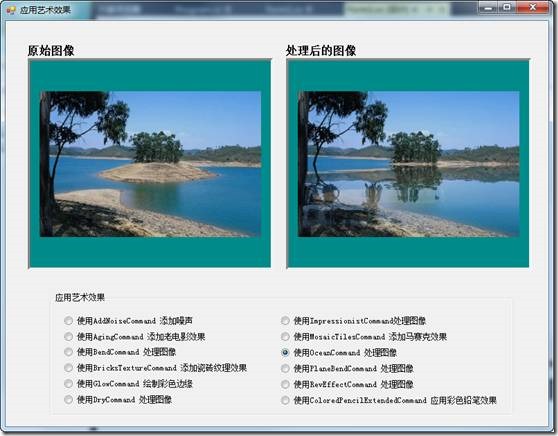
| radioButton9 | 使用OceanCommand 处理图像 |
| radioButton10 | 使用PlaneBendCommand 处理图像 |
| radioButton11 | 使用RevEffectCommand 处理图像 |
| radioButton12 | 使用ColoredPencilExtendedCommand 应用彩色铅笔效果 |
4. 切换至Form1的代码视图(右击Form1,选择查看代码),将下面几行代码添加到文件开始处:
1: using Leadtools;2: using Leadtools.Codecs;3: using Leadtools.WinForms;4: using Leadtools.ImageProcessing;5: using Leadtools.ImageProcessing.Effects;6: using Leadtools.ImageProcessing.SpecialEffects;
5. 将以下变量添加至Form1类:
1: private RasterImageViewer beforePic;2: private RasterImageViewer afterPic;3: private RasterCodecs codecs;4: private RasterImage temp;
6. 添加Form1 Load事件句柄,在其中添加以下代码:
1: beforePic = new RasterImageViewer();2: beforePic.BackColor = Color.DarkCyan;3: beforePic.Dock = DockStyle.Fill;4: beforePic.InteractiveMode = RasterViewerInteractiveMode.Pan;5: beforePic.HorizontalAlignMode = RasterPaintAlignMode.Center;6: beforePic.VerticalAlignMode = RasterPaintAlignMode.Center;7: beforePic.AutoResetScaleFactor = false;8: panelBefore.Controls.Add(beforePic);9: beforePic.BringToFront();10:11: afterPic = new RasterImageViewer();12: afterPic.BackColor = beforePic.BackColor;13: afterPic.Dock = beforePic.Dock;14: afterPic.InteractiveMode = beforePic.InteractiveMode;15: afterPic.HorizontalAlignMode = beforePic.HorizontalAlignMode;16: afterPic.VerticalAlignMode = beforePic.VerticalAlignMode;17: afterPic.AutoResetScaleFactor = beforePic.AutoResetScaleFactor;18: panelAfter.Controls.Add(afterPic);19: afterPic.BringToFront();20:21: codecs = new RasterCodecs();22: codecs.ThrowExceptionsOnInvalidImages = true;23: beforePic.Image = codecs.Load(Path.Combine(Application.StartupPath, @"..\..\Pic\Image.jpg"));
7. 双击radioButton1,在radioButton1 CheckedChanged事件句柄中添加以下代码:
(本段代码为AddNoiseCommand类的使用)
1: temp = beforePic.Image.Clone();2:3: AddNoiseCommand command = new AddNoiseCommand();4: command.Range = 250;5:6: command.Channel = RasterColorChannel.Red;7: command.Run(temp);8: afterPic.Image = temp;9: codecs.Save(temp, Path.Combine(Application.StartupPath, @"..\..\Pic\AddNoiseCommand.jpg"), RasterImageFormat.Jpeg, 24);10:
8. 双击radioButton2,在radioButton2 CheckedChanged事件句柄中添加以下代码:
(本段代码为AgingCommand类的使用)
1: temp = beforePic.Image.Clone();2: // 准备命令3: AgingCommand command = new AgingCommand();4: command.HorizontalScratchCount = 10;5: command.VerticalScratchCount = 2;6: command.MaximumScratchLength = 50;7: command.DustDensity = 2;8: command.PitsDensity = 5;9: command.MaximumPitSize = 6;10: command.ScratchColor = new RasterColor(255, 255, 0);11: command.DustColor = new RasterColor(0, 0, 0);12: command.PitsColor = new RasterColor(0, 0, 255);13: command.Flags = AgingCommandFlags.AddVerticalScratch | AgingCommandFlags.AddPits | AgingCommandFlags.ScratchInverse | AgingCommandFlags.PitsColor;14:15: command.Run(temp);16: afterPic.Image = temp;17:
9. 双击radioButton3,在radioButton3 CheckedChanged事件句柄中添加以下代码:
(本段代码为BendCommand类的使用)
1: temp = beforePic.Image.Clone();2: // 准备命令3: BendCommand command = new BendCommand();4: command.Value = 100;5:6: command.CenterPoint = new LeadPoint(temp.Width / 2, temp.Height / 2);7: command.Flags = BendCommandFlags.Repeat | BendCommandFlags.WithoutRotate | BendCommandFlags.Normal;8: command.Run(temp);9: afterPic.Image = temp;
10. 双击radioButton4,在radioButton4 CheckedChanged事件句柄中添加以下代码:
(本段代码为BricksTextureCommand类的使用)
1: temp = beforePic.Image.Clone();2: // 准备命令3: BricksTextureCommand command= new BricksTextureCommand();4: command.BricksWidth = 60;5: command.BricksHeight = 20;6: command.OffsetX = 0;7: command.OffsetY = 0;8: command.EdgeWidth = 3;9: command.MortarWidth = 4;10: command.ShadeAngle = 315;11: command.RowDifference = 33;12: command.MortarRoughness = 20;13: command.MortarRoughnessEvenness = 0;14: command.BricksRoughness = 10;15: command.BricksRoughnessEvenness = 0;16: command.MortarColor = new RasterColor(0, 0, 0);17: command.Flags = BricksTextureCommandFlags.SmoothedOutEdges | BricksTextureCommandFlags.TransparentMortar;18:19: //在图像上应用砖块纹理20: command.Run(temp);21: afterPic.Image = temp;
11. 双击radioButton5,在radioButton5 CheckedChanged事件句柄中添加以下代码:
(本段代码为GlowCommand类的使用)
1: temp = beforePic.Image.Clone();2: // 准备命令3: GlowCommand command = new GlowCommand();4: command.Dimension = 5;5: command.Brightness = 3;6: command.Threshold = 0;7: // 在图像上应用发光效果8: command.Run(temp);9: afterPic.Image = temp;
12. 双击radioButton6,在radioButton6 CheckedChanged事件句柄中添加以下代码:
(本段代码为DryCommand类的使用)
1: temp = beforePic.Image.Clone();2:3: DryCommand command = new DryCommand();4: command.Dimension = 5;5: command.Run(temp);6: afterPic.Image = temp;
13. 双击radioButton7,在radioButton7 CheckedChanged事件句柄中添加以下代码:
(本段代码为ImpressionistCommand类的使用)
1: temp = beforePic.Image.Clone();2:3: ImpressionistCommand command = new ImpressionistCommand();4: command.HorizontalDimension = 10;5: command.VerticalDimension = 10;6:7: command.Run(temp);8: afterPic.Image = temp;
14. 双击radioButton8,在radioButton8 CheckedChanged事件句柄中添加以下代码:
(本段代码为MosaicTilesCommand类的使用)
1: temp = beforePic.Image.Clone();2:3: MosaicTilesCommand command = new MosaicTilesCommand();4: command.BorderColor = new RasterColor(0, 0, 0);5: command.TilesColor = new RasterColor(255, 255, 255);6: command.TileWidth = 50;7: command.TileHeight = 50;8: command.Opacity = 50;9: command.ShadowThreshold = 50;10: command.ShadowAngle = ShadowCommandAngle.East;11: command.PenWidth = 7;12: command.Flags = MosaicTilesCommandFlags.Cartesian |MosaicTilesCommandFlags.ShadowGray;13: command.Run(temp);14: afterPic.Image = temp;
15. 双击radioButton9,在radioButton9 CheckedChanged事件句柄中添加以��代码:
(本段代码为OceanCommand类的使用)
1: temp = beforePic.Image.Clone();2:3: OceanCommand command = new OceanCommand();4: command.Amplitude = 20;5: command.Frequency = 6;6: command.LowerTransparency = true;7: command.Run(temp);8: afterPic.Image = temp;
16. 双击radioButton10,在radioButton10 CheckedChanged事件句柄中添加以下代码:
(本段代码为PlaneBendCommand类的使用)
1: temp = beforePic.Image.Clone();2:3: PlaneBendCommand command = new PlaneBendCommand();4: command.CenterPoint = new LeadPoint(temp.Width / 2, temp.Height / 2);5: command.ZValue = 0;6: command.Distance = temp.Height;7: command.PlaneOffset = temp.Width / 2;8: command.Repeat = -1;9: command.PyramidAngle = 0;10: command.Stretch = 100;11: command.BendFactor = 400;12: command.StartBright = 0;13: command.EndBright = 100;14: command.BrightLength = 20000;15: command.BrightColor = new RasterColor(255, 255, 255);16: command.FillColor = new RasterColor(0, 0, 0);17: command.Flags = PlaneCommandFlags.Down | PlaneCommandFlags.Up | PlaneCommandFlags.Color;18: command.Run(temp);19: afterPic.Image = temp;
17. 双击radioButton11,在radioButton11 CheckedChanged事件句柄中添加以下代码:
(本段代码为RevEffectCommand类的使用)
1: temp = beforePic.Image.Clone();2:3: RevEffectCommand command = new RevEffectCommand();4: command.LineSpace = 3;5: command.MaximumHeight = 35;6:7: command.Run(temp);8: afterPic.Image = temp;
18. 双击radioButton12,在radioButton12 CheckedChanged事件句柄中添加以下代码:
(本段代码为ColoredPencilExtendedCommand类的使用)
1: temp = beforePic.Image.Clone();2:3: ColoredPencilExtendedCommand command = new ColoredPencilExtendedCommand();4: command.Size = 5;5: command.Strength = 4;6: command.Threshold = 0;7: command.PencilRoughness = 250;8: command.StrokeLength = 15;9: command.PaperRoughness = 100;10: command.Flags = ColoredPencilExtendedCommandFlags.Artistic;11: command.Run(temp);12: afterPic.Image = temp;
19.编译运行程序,本DEMO分别使用了12个类处理图像,对图像应用艺术效果,结果如下图:
若想了解更多LeadTools艺术效果的相关类和说明,请继续浏览文章的下一部分!
DEMO下载:
本博文Demo提供了LeadTools应用艺术效果的一个基本用例,如果你想尝试更多的效果,如海报效果、意外曝光等,欢迎下载LeadTools全功能试用版,并在本文例子代码上修改。很简单的,你来试试吧。
LeadTools“应用艺术效果”相关类介绍
|
类名 |
说明 |
|
给图像添加随机像素,您可以指定覆盖范围的百分比和颜色平面。 |
|
|
模拟随机颜色的改变、划痕、灰尘和凹坑,处理完后的图像看起来有老电影的效果。 |
|
|
将两个图像以一个固定的不透明度合并,创建出一个新的混合图像。 |
|
|
沿着圆弧图案的内侧或外侧包裹图像。 |
|
|
添加砖的纹理效果,使图像看起来像是画在砖墙上。 |
|
|
将图像与一个凹凸图像合并,来创建三维纹理图案。 |
|
|
合并两个图像,将一个图像叠加到另一个图像上,后一个图像就相当于是一张画布。 |
|
|
随机生成不同的云模式。 |
|
|
将一个彩色的球体扔到图像上。像素的颜色与球体的颜色合并,且不透明度将有一定的下降程度。 |
|
|
应用此类后,图像的效果看起来像用彩色铅笔绘制的。 |
|
|
和ColoredPencilCommand类似,应用后图像的效果看起来像用彩色铅笔绘制的。但此类的参数更多。 |
|
|
将图像变为圆柱形状。 |
|
|
将图像分割为正方形或长方形快。如果块时正方形,将每块旋转0、90、180或270度。如果块为长方形,绕着X轴和Y轴翻转块。 |
|
|
在图像的亮区或暗区添加一个彩色光晕,使得这些部分看起来有霓虹灯般的光芒。 |
|
|
模拟水彩干刷技术绘制图像的效果。 |
|
|
给图像添加浮雕效果,可以设置这个效果的深度和方向 |
|
|
创建一个渐变遮罩的图像。 |
|
|
使用羽化合并两个图像,羽化时使用了取决于渐变遮罩的不透明度变量。 |
|
|
使用振幅数组通过所画的波形剪切图像。 |
|
|
通过振幅数组和旋转角度中指定的波形,扭曲图像。 |
|
|
将图像包裹在一个以曲线塑造的3D平面上。 |
|
|
将图像按着曲线塑造的3D平面的半径包裹。 |
|
|
将图像划分为矩形的单元格,仿佛通过玻璃块在查看图像。 |
|
|
使图像的彩色边缘闪耀着着霓虹灯的光芒。 |
|
|
模拟亮光照射到相机镜头二次反射后的效果。镜头的闪光折射成围绕这个光晕的一系列亮圈。 |
|
|
根据基于方法的分割将光添加到图像中。这个方法使用的光由以下几种方法生成: 线性,二次,正弦,余弦,或使用徒手点。 |
|
|
使得图像看起来像出自印象派画家之手。 |
|
|
给图像添加马赛克效果,将图像划分为指定大小的块,然后将每个块中所有像素的值改为这个块像素的平均值。 |
|
|
在图像上添加马赛克效果。将图像划分为具有不规律边界的矩形或圆弧形单元格,并改变每个单元格的颜色。 |
|
|
应用一个滤波器,在图像中创建图像运动的假象。 |
|
|
将图像映射到海洋表面。 |
|
|
在图像中应用油画效果。 |
|
|
使用伪随机数生成器生成柏林噪声,然后将噪声转化为纹理。 |
|
|
合并列表中的图像,并用新生成的图像替代一个图像。 |
|
|
使用一个单个图像的各种版本绘制新图像。 |
|
|
将一个图像换分为矩形或圆形的单元格,然后使用填充了最小值、最大值或平均像素值得单元格重新创建图像,使用哪个值取决于您设置的效果。 |
|
|
将图像沿着Z轴放置在平行平面,并朝着中心点弯曲。 |
|
|
将图像沿着Z轴放置在平行平面。 |
|
|
应用彩色样式并将它们互相融合。 |
|
|
将图像颜色转化为随机放置的点,来创建一副点彩画。 |
|
|
将图像从矩形转化为极坐标,反之亦然。 |
|
|
通过将图像的色彩量化为一个每平面色彩级别的特定数目,来给图像添加海报效果。例如,两个级别意味着两个红色、两个黄色和两个蓝色。 |
|
|
通过将图像向中心挤压或从中心向外扩展来弯曲图像。 |
|
|
将图像分割为多块,然后在图像中随机化这些块。 |
|
|
将图像分割为一定数量的圈。每个圈根据旋转角度进行旋转。每个圈的旋转角度由方法随机产生或被传到此方法中。 |
|
|
通过绕着中心点旋转像素模糊图像。 |
|
|
使用从中心辐射的波形扭曲图像。 |
|
|
在图像中添加伪3D波效果。 |
|
|
使用lookup表格改变图像的色相。 |
|
|
以指定的颜色替换像素中的红色成分。在图像中只替换眼睛区域的像素,因此需在眼部周围选择一个小的区域。 |
|
|
在同心圆内扭曲图像。 |
|
|
将图像划分为长方形或圆角矩形瓷砖,随机选择瓷砖像素的颜色填充它们。 |
|
|
将图像划分为段,每个段的像素具有大致相同的颜色(颜色均匀)。 |
|
|
在图像中添加阴影,您可以设定阈值、光源的方向,并决定阴影是彩色还是灰度的。 |
|
|
绕着一个3D球形,扭曲图像。 |
|
|
根据旋转角度旋转图像,以产生漩涡的模式。 |
|
|
模拟胶卷意外曝光的效果,在图像中应用此种效果。 |
|
|
在有底衬的效果下合并两个图形中的数据。结果可用于渐变遮罩,合并具有变量不透明度的两幅图像。还可以与使用常量不透明度的目标图像合并。 |
|
|
沿Z轴将图像放置在一个通道里。 |
|
|
合并两个图形,使得一个图像看起来像两一个图像的纹理 |
|
|
使用特定角度特定波形的两个垂直波扭曲图像。 |
|
|
创建细线,以特定的角度引导它,作用于被影响的图像上。 |
|
|
从特定中心点开始沿着半径线模糊图像。 |
|
|
使用从特定中心放大的波形扭曲图像。 |
除了Underlay,以上的任何一种方法都可以限定感兴趣的区域。
将图像看做设备管理器为应用艺术效果开启了更多的可能性。使用CreateLeadDC方法可以获取设备上下文。然后您就可以使用LEADTOOLS特殊效果以有趣的方式类合并图像了。例如,在一个图像的顶端绘制另一幅图像时,您可以使用画刷效果指定多通道绘制,在完成所有通道的绘制后退出。结果将会是两个图像的混合。
若您在使用LeadTools的过程中遇到任何问题,欢迎在葡萄城开发者社区LeadTools板块提问,我们的专业技术团队期待您的到来!


